
Introduction
Incoming calls become confusing when every caller sounds the same, the volume feels too low, or a custom tone does not appear in the list. Many beginners open settings first but miss the difference between ringtone, notification alerts, media volume, and contact tones.
The problem feels worse when the phone stays on silent mode, Do Not Disturb blocks alerts, or one contact uses a separate tone. A new audio file also fails to appear when the ringtone list has not updated yet.
This guide explains how to change ringtone on Android without using advanced settings. Follow the steps below when you want a clearer call alert, a custom tone, or a different tone for important contacts.
Step-by-Step Guide: Change Ringtone on Android
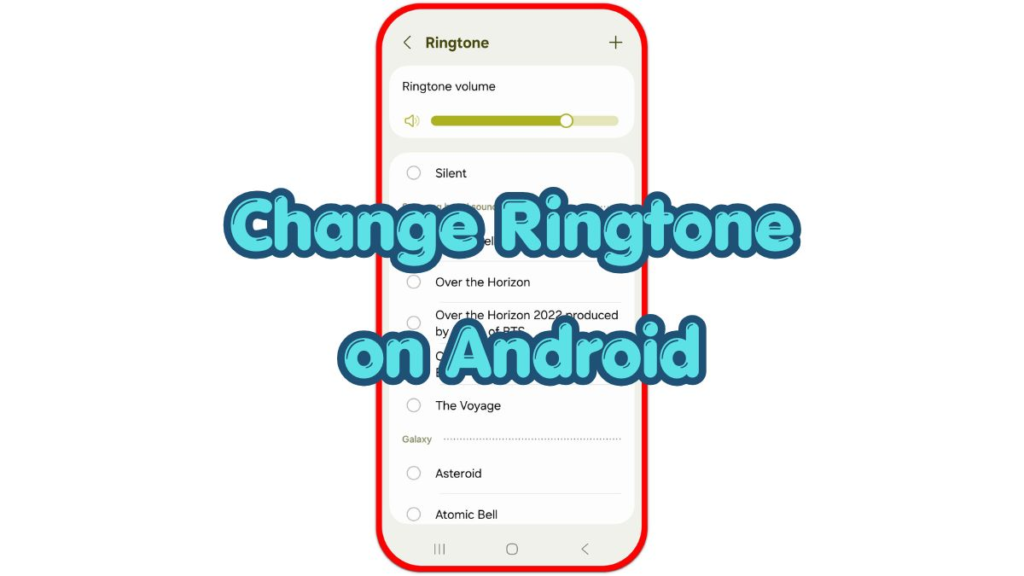
Step 1: Open Sound Settings and Find Ringtone
Open the Settings app on your Android phone. Swipe down from the top of the screen and tap the gear icon if you prefer the quick settings panel.
Tap Sound, Sounds and vibration, or a similar menu. Samsung phones usually place this option under Sounds and vibration, while other Android phones often use Sound or Sound & vibration.
Tap Ringtone or Phone ringtone. This screen controls incoming calls, not message alerts, alarms, or media playback.
Step 2: Choose a Built-In Tone or Add Custom Audio
Tap a built-in tone and listen to the preview. Choose one that stays clear enough to hear in normal places such as a room, car, pocket, or bag.
Use Add, Add from phone, or a plus button when you want to use your own audio file. Pick a short file stored on the phone, then confirm the choice when the phone asks you to save or select it.
Keep the tone simple and easy to recognize. Long music clips often start too slowly, while a short clear tone makes incoming calls easier to notice.
Step 3: Check Volume, Vibration, and Contact Tones
Return to the same menu and open Volume. Raise the ringtone volume separately from media volume, because calls and video playback use different controls.
Turn on vibrate while ringing when you often miss calls in a pocket, bag, or noisy place. Vibration gives an extra alert even when the tone is harder to hear.
Open the Contacts app when one person needs a separate tone. Select the contact, tap Edit or More, choose Ringtone, and save the change so that the caller uses a separate tone from the default setting.
Troubleshooting
Troubleshooting 1: The Call Alert Did Not Change
Check silent mode, Do Not Disturb, and call volume first. A new tone still sounds quiet when silent mode or Do Not Disturb limits call alerts.
Open the same ringtone screen again and confirm that the selected tone still shows as the current choice. Restart the phone when the setting looks correct but the old tone keeps playing.
Troubleshooting 2: Custom Tone Does Not Appear
Move the audio file to a clear folder such as Ringtones or Music, then reopen the picker. Some phones need a moment to scan new audio files before they appear in the list.
Use a short, normal audio file instead of a very long recording. Rename the file with simple letters when the phone has trouble showing it in the list.
Troubleshooting 3: One Contact Uses the Wrong Tone
Open that contact and check its tone setting. A separate contact tone overrides the default setting, so one caller still sounds different after you change the main choice.
Remove the separate contact tone or choose a new one for that person. Save the contact again before testing incoming calls.
Extra Section 1: Default Ringtone vs Contact Tone
The default ringtone applies to most incoming calls. It is the main tone you hear when people call your Android phone.
A contact tone applies only to one saved person. This helps when you want family, work, or important contacts to stand out without checking the screen.
Extra Section 2: Built-In Tone vs Custom Audio
Built-in tones work quickly because the phone already stores them in the ringtone menu. They are useful when you want a safe, simple choice without managing audio files.
Custom audio gives more control, but it needs the right file location and a clear clip. A short tone with a strong opening works better than a long song that takes time to become recognizable.
Additional Tips
Choose a tone that stays clear at normal volume before raising it too high. A sharp, simple alert often works better than a soft music clip in busy places.
Keep custom audio files in one folder so the phone finds them more easily later. Simple file names also make each option easier to identify in the picker.
Check call volume after changing Bluetooth, silent mode, or Do Not Disturb settings. These settings change how calls behave even when the selected tone is correct.
Final Notes: Change Ringtone on Android
A clearer call alert starts with the default setting, then volume, vibration, and contact-specific tones. Change one setting at a time and test incoming calls before adjusting another option.
Use a clear built-in tone for the fastest fix, or choose a short custom audio file when you want a more personal call alert. This keeps incoming calls easier to notice without making the phone harder to manage.
Checklist
- Open Sound or Sounds and vibration settings.
- Tap Ringtone or Phone ringtone.
- Choose a built-in tone and preview it.
- Add custom audio only when the phone shows the file clearly.
- Check call volume separately from media volume.
- Review contact tone settings when one caller sounds different.